
 3.0 l _ 163 hp _ 2003 _ 2004 _ 2005 _ 2006 _ Specs, off-road data, gear ratios, and approach angles")
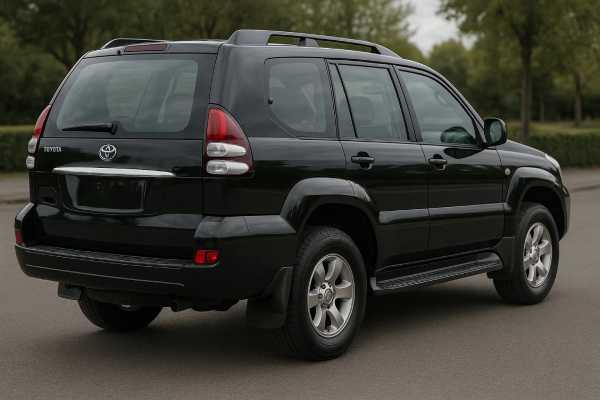
The 2003–2006 Toyota Land Cruiser KDJ120 (often called “120 Series”) pairs a body-on-frame SUV platform with Toyota’s 1KD-FTV 3.0-litre common-rail turbodiesel. It is the European diesel sibling to the UZJ120 petrol models and was offered in three- and five-door forms. Owners value its blend of unflappable durability, low-rpm torque, and well-calibrated four-wheel-drive hardware (Torsen centre differential, low range, and clever traction control). On road, it is quieter and more refined than older 90-series diesels; off road, it carries real-world geometry and a robust ladder chassis. The 120’s market sweet spot is the five-door manual for towing and touring, while the automatic suits mixed city–motorway use. Compared with softer crossovers of the era, the Land Cruiser trades some agility for payload, approach/departure angles, and a long service life—provided routine maintenance is done on time and the fuel system stays healthy.
At a Glance
- Stout ladder frame, low-range transfer case, and A-TRC give real off-road ability without lifts or lockers.
- 1KD-FTV delivers high-idle torque and relaxed cruising; manual versions feel strongest under load.
- Five-door practicality with 87 L tank and flexible seating; towing up to 2,800 kg (braked).
- Watch for injector-seal and EGR-soot issues on neglected diesels; address early.
- Typical oil service every 10,000 miles / 12 months (15,000 km / 12 months) on European schedules.
Navigate this guide
- KDJ120 D-4D overview
- KDJ120 specs and data
- Trims, options and safety tech
- Reliability and known issues
- Maintenance and buyer’s guide
- Driving and performance
- KDJ120 rivals and alternatives
KDJ120 D-4D overview
Toyota’s KDJ120 Land Cruiser arrived in Europe as a major step up from the 90-series. The 1KD-FTV 3.0 D-4D engine introduced high-pressure (up to ~1,350 bar) common-rail injection and a variable-nozzle turbocharger with intercooling to deliver strong low-rpm pull and markedly better refinement. In period materials you will see “161 bhp” (120 kW) quoted; that equates closely to 163 PS (metric hp), which explains minor published differences in power figures. Peak torque in early models is 343 Nm, with calibration and gearbox affecting the usable band; later 2005 updates modestly improved output and brought a five-speed automatic.
The chassis uses a traditional ladder frame with double-wishbone front suspension and a four-link live rear axle. It is a mature, proven package rather than an experimental one, and it makes the 120 predictable to service over high mileages. Critical to its versatility is the full-time four-wheel-drive system with a Torsen centre differential, a lockable centre diff, and a two-speed transfer case (high 1.000; low 2.566). Toyota’s A-TRC (Active Traction Control) quietly brakes a spinning wheel to feed torque across the axle; Downhill Assist Control (DAC) and Hill-start Assist Control (HAC) appeared depending on trim and year.
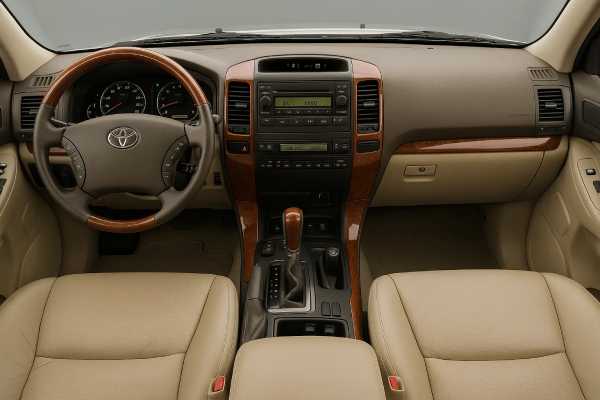
Inside, the 120 introduced better NVH isolation and comfort than older Land Cruisers, with seating for five or up to seven (depending on market and grade). The five-door’s 87-litre tank and practical cargo bay made it a go-to for family touring, towing, and winter commuting. Off-road, the geometry works: around 215 mm ground clearance, approach up to 32°, departure 24–25°, and 700 mm wading (at a steady crawl) make trails and rough tracks feel easy, especially on OE-size tyres.
If you are cross-shopping, think of the 120 as the “honest tool” among mid-2000s SUVs—less plush than contemporary luxury SUVs, but engineered for decades of use. The key to ownership happiness is preventive maintenance (fluids, timing belt, fuel filtration) and early intervention on the small diesel-specific age items (injector seating, EGR soot, SCV).
KDJ120 specs and data
Engine and Performance (1KD-FTV, diesel)
| Item | Detail |
|---|---|
| Code | 1KD-FTV (D-4D) |
| Layout & cylinders | Inline-4, DOHC, 4 valves/cyl, intercooler |
| Displacement | 3.0 L (2,982 cc) |
| Induction | Variable-nozzle turbocharger, air-to-air intercooler |
| Fuel system | Common-rail direct injection (up to ~1,350 bar) |
| Compression ratio | 18.4 : 1 |
| Max power | 120 kW (161 bhp ≈ 163 PS) @ 3,400 rpm |
| Max torque | 343 Nm (253 lb-ft) @ 1,600–3,200 rpm (calibration varies) |
| Emissions standard | Euro 3 (model-year dependent) |
| Real-world highway (75 mph / 120 km/h) | Typically 8.5–9.5 L/100 km (27.7–24.8 mpg US / 33.2–29.7 mpg UK), stock tyres, mild load |
Transmission and Driveline
| Item | Detail |
|---|---|
| Transmission | 5-speed manual (R151F) or 4-speed automatic (A343F); late 2005 gained 5-speed automatic on selected specs |
| Gear ratios — Manual | 1st 4.313 • 2nd 2.330 • 3rd 1.436 • 4th 1.000 • 5th 0.838 • Rev 4.220 |
| Gear ratios — 4-AT | 1st 2.804 • 2nd 1.531 • 3rd 1.000 • 4th 0.705 • Rev 2.393 |
| Final drive ratio | 4.100 (manual) • 4.300 (auto) |
| Transfer case | Two-speed, high 1.000 • low 2.566 |
| Drive type | Full-time 4×4 with Torsen centre differential; centre diff lockable |
| Differential features | Open front/rear; electronic A-TRC torque vectoring via braking |
Chassis and Dimensions
| Item | 3-door | 5-door |
|---|---|---|
| Suspension (F/R) | Double-wishbone / four-link live axle with coils | Same |
| Steering | Rack-and-pinion; ~15.6:1 | Same |
| Brakes (F/R) | Vented discs 338 × 32 mm / solid discs 312 × 18 mm | Same |
| Wheels/Tyres (common OE) | 16–17 in; e.g., 265/65 R17 | Same |
| Ground clearance | ~215 mm (8.5 in) | ~215 mm (8.5 in) |
| Angles (approach/departure/breakover) | 32° / 25° / 24° | 32° / 24° / 22° |
| Length × Width × Height | 4,395 × 1,875 × 1,845 mm (173.0 × 73.8 × 72.6 in) | 4,715 × 1,875 × 1,845 mm (185.6 × 73.8 × 72.6 in) |
| Wheelbase | 2,450 mm (96.5 in) | 2,790 mm (109.8 in) |
| Turning circle (kerb-to-kerb) | 11.2 m (36.7 ft) | 11.4 m (37.4 ft) |
| Kerb (curb) weight | ~1,960–2,120 kg (4,321–4,674 lb) depending on trim | ~2,120–2,260 kg (4,674–4,982 lb) depending on trim |
| GVWR | ~2,650–2,950 kg (5,842–6,504 lb) | ~2,850–3,000 kg (6,283–6,614 lb) |
| Fuel tank | 87 L (22.98 US gal / 19.14 UK gal) | 87 L (22.98 US gal / 19.14 UK gal) |
| Cargo volume (seats up/down) | Practical two-box; varies with seating; five-door offers generous flat load bay | — |
Performance and Capability
| Metric | Manual | Automatic |
|---|---|---|
| 0–100 km/h (0–62 mph) | ~12.7 s | ~12.8 s |
| Top speed | ~165 km/h (103 mph) | ~171 km/h (106 mph) |
| Braking (100–0 km/h) | Typical contemporary tests ~40–43 m (131–141 ft) on OE tyres | Similar |
| Towing capacity (braked) | Up to 2,800 kg (6,173 lb) | Up to 2,800 kg (6,173 lb) |
| Payload | Trim-dependent; typically ~600–700+ kg (1,323–1,543+ lb) | Similar |
| Roof load | ~100 kg (220 lb) with approved rails | — |
Fluids and Service Capacities
| System | Specification | Capacity (approx.) |
|---|---|---|
| Engine oil | ACEA B4 / API CH-4 or better; viscosity per climate (commonly 5W-30) | ~7–8 L (7.4–8.5 US qt); verify by VIN |
| Coolant | Ethylene-glycol OAT per Toyota guidance | ~8–9 L (8.5–9.5 US qt) typical; verify |
| Manual gearbox | GL-4/GL-5 75W-90 (per service info) | ~1.7–2.0 L (1.8–2.1 US qt) |
| Automatic transmission | Toyota ATF Type T-IV / later WS where specified | Sump refill ~3–4 L; dry cap. higher |
| Transfer case | GL-4/GL-5 75W-90 | ~1.2–1.5 L |
| Differentials (F/R) | GL-5 75W-90 | ~1.3–1.8 L each |
| A/C refrigerant | R134a | Charge varies by system; verify label |
| Key torque examples | Wheel nuts ~103 Nm (76 lb-ft); drain plugs ~39 Nm (29 lb-ft); confirm per service manual | — |
Notes: Fluids and volumes vary by VIN, gearbox, axle, and climate pack. Always confirm with the vehicle’s service documentation.
Electrical
| Item | Detail |
|---|---|
| Alternator | Output varies by equipment; typical mid-output unit for diesel SUV of the era |
| 12 V battery | DIN-form factor; high CCA recommended for cold starts |
| Spark plugs | Not applicable (diesel uses glow plugs) |
Safety and Driver Assistance
| Feature | Status |
|---|---|
| Crash ratings | No Euro NCAP rating published for this generation in Europe |
| Airbags | Up to eight; dual-stage front, side, and curtain (trim/year dependent) |
| ABS / EBD | Standard |
| Stability / Traction | VSC (Vehicle Stability Control) with A-TRC on most higher trims/years |
| DAC / HAC | Available on selected trims/years |
| Child-seat | ISOFIX points provided (rear outboard) |
| Headlights | Halogen units; projector on high trims; headlight-wash available |
Trims, options and safety tech
Toyota’s trim structure varied by market, but in the UK the 120 launched with a clear ladder (LC2, LC3, LC4, LC5), each adding meaningful function.
LC2 (entry)
- Steel wheels, cloth interior, manual A/C, basic audio.
- Full-time 4×4 with low range and centre diff lock.
- ABS/EBD standard; front/side airbags (curtain coverage varied by year).
- Ideal for fleets, conversion to overland spec, or those prioritising simplicity.
LC3 (mid)
- Adds alloy wheels, improved audio, roof rails, and more comfort features.
- Often the value pick: retains the robust hardware without luxury cost.
- Many LC3s are manual, popular with tow users.
LC4 (upper-mid)
- Gains climate control, more airbags, A-TRC/VSC availability improves, DAC/HAC available.
- Larger wheels/tyres; projector headlamps and fog lights common.
- Better NVH isolation with extra trim content.
LC5 (range-topper)
- Leather, electric heated seats, premium audio and navigation packages.
- Most LC5s are automatics; late-2005 models may feature the smarter 5-speed auto.
- Highest curb weight; ride comfort bias; still fully capable off-road.
Year-to-year highlights (2003–2006)
- 2003 launch: 1KD-FTV at 120 kW (≈161 bhp/163 PS), 343 Nm; 5-MT or 4-AT; A-TRC, DAC, HAC features vary by trim.
- 2005 update: power/response improvements and a 5-speed automatic on selected grades; stability and traction feature adoption widened on high trims; detail changes to equipment and audio/navigation.
- Packages/Options: rear air conditioning on seven-seat models; headlamp wash; factory tow-bar; 17-in alloys; sunroof; parking sensors; in-dash navigation (map updates now via owner portal or third-party).
Quick identifiers
- Badging: “D-4D” wing badges; trim number on tailgate.
- VIN/build plates: engine code 1KD, trans/axle codes (e.g., R151F / A343F; A02A/A03A diffs) decode ratios and axle types.
- Interior tells: LC5 leather/wood accents and factory nav; LC2 simpler cluster and HVAC panel.
Safety and ADAS evolution
- Eight-airbag coverage appears on higher grades; earlier base trims may have fewer.
- A-TRC and VSC availability grew with spec and year; calibration is compatible with ABS service tools.
- After bumper or windscreen work, check parking sensors and rain sensors (where fitted) and recalibrate steering angle sensor if VSC/ABS codes point to it.
Reliability and known issues
The 120 diesel’s reputation for longevity is well earned, but any 20-year-old SUV needs methodical checks. Below are the headline items, mapped by prevalence and severity.
Common / Low-to-Medium severity
- EGR and intake soot → Symptoms: rough idle, flat midrange, smoke. Cause: EGR + oily vapour deposits. Remedy: clean EGR valve and intake; refresh PCV hoses; update ECU calibration if available; use high-quality fuel and regular long runs to keep deposits in check.
- Suction Control Valve (SCV) wear (fuel pump) → Symptoms: hesitation, warm-stall, limp mode under load. Cause: SCV plunger wear leads to rail-pressure instability. Remedy: replace SCV; clear codes; adapt/prime fuel system; inspect filter housing for air leaks.
- Front suspension wear → Symptoms: clunks, vague steering, tyre feathering. Cause: lower control-arm bushes/ball joints and ARB links age. Remedy: replace bushes/ball joints in pairs; align to OE specs; torque at ride height.
- Rear axle breathers → Symptoms: weeping seals after hot runs. Cause: blocked breather builds pressure. Remedy: free/replace breather; renew seals if needed.
Occasional / Medium severity
- Injector seat washer leakage (“black death”) → Symptoms: chuffing sound, diesel smell, tar-like carbon around injectors; misfires if advanced. Cause: copper sealing washers lose crush or were reused. Remedy: remove injectors, clean bores, fit updated washers and torque to spec; change oil afterwards as precaution. Early repair avoids oil pickup blockage and turbo damage.
- Turbo VNT stiction → Symptoms: intermittent over/under-boost, limp mode, P codes. Cause: soot on vanes from short cycles. Remedy: free vanes, verify actuator, ensure no boost leaks; recalibrate if updated software available.
Rare / High severity
- Bottom-end lubrication starvation (secondary to severe injector leak) → Symptoms: tapping/knock, low oil pressure. Cause: tar dislodges and blocks pickup. Remedy: sump off, clean pickup, assess bearings; prevention is timely injector-seal service.
- Transfer/centre diff misuse → Symptoms: driveline wind-up, binding on tarmac. Cause: centre diff left locked on-road. Remedy: educate use; service actuator; check for ABS/VSC faults caused by tyre mismatch.
Corrosion hot spots
- Rear chassis crossmember and spring perches, body seams under tailgate seal, spare-wheel winch, brake-pipe runs along chassis, and the front subframe skid area. Treat early; underbody washes after winter matter.
Recalls, TSBs, and field actions (Europe)
- Takata airbag inflators (selected VINs/years): affected vehicles receive new inflators; check status.
- General field actions: Toyota periodically issues customer satisfaction campaigns or software updates (engine management, instrument cluster or VSC logic) based on VIN.
- How to verify: use Toyota’s official recall checker with registration/VIN and request dealer print-outs of completed actions.
Pre-purchase checklist
- Full service history with evidence of regular oil changes (time as well as mileage).
- Proof of timing-belt replacement within time/mileage window.
- Fuel filter replacements on schedule; no rail-pressure or injector-balance codes at idle.
- Underbody and chassis inspection on a lift (rust, brake lines, tank straps, crossmembers).
- Driveshaft slip-yokes and U-joints free of play; listen for front diff whine on overrun.
- HVAC and auxiliary electrics working; damp checks in rear quarter (for seven-seat cars).
Maintenance and buyer’s guide
Service rhythm (practical schedule for an ageing 120)
- Engine oil/filter: every 10,000 miles / 12 months (15,000 km / 12 months). Use ACEA B4 5W-30 (or viscosity per climate) and quality filters.
- Fuel filter: 20,000–30,000 miles (30,000–50,000 km) or 2 years; sooner after bad fuel events.
- Air filters: engine every 20,000 miles (30,000 km) or 2 years in normal dust; cabin pollen filter annually.
- Coolant: 5 years / 100,000 km, then every 3 years; use Toyota-approved OAT coolant and correct mix.
- Timing belt (1KD): replace on the manufacturer’s interval (time and mileage); always renew tensioner/idlers and water pump if due.
- Accessory belts/hoses: inspect annually; replace cracked or glazed belts; check idlers.
- Manual gearbox, transfer, diffs: drain/fill every 60,000 miles (100,000 km) or 6 years if worked hard (towing/off-road/water crossings).
- Automatic transmission: drain/fill (not “flush”) with T-IV/WS as specified; pan clean and strainer service ~60,000 miles (100,000 km).
- Brake fluid: every 2 years; inspect pads/rotors each service.
- Steering/suspension alignment: tyre rotation 6,000–8,000 miles (10,000–12,000 km) and an annual alignment check; set toe to factory spec.
- Battery/glow system: load test before winters; glow-plug resistance check at major services.
Fluid guide (decision-making essentials)
- Oil: ACEA B4 / API CH-4+ diesel oil; 5W-30 is the common European fill; severe towing/hot climates may justify 5W-40 within spec.
- ATF: Toyota Type T-IV for 4-AT; later 5-AT may specify WS—never mix; confirm by VIN.
- Axles/transfer: GL-5 75W-90 is widely used; LSDs (if fitted in some markets) require compatible gear oil.
- Torque reminders: wheel nuts ~103 Nm (76 lb-ft); injector hold-downs and belt tensioners must be torqued strictly to service-manual values.
Buyer’s short list
- Best all-rounder: five-door LC3/LC4 manual with documented timing-belt and injector-seal work.
- Town and trail: LC4/LC5 automatic (late-2005 five-speed if available) with working A-TRC/VSC and fresh ATF.
- What to avoid: neglected diesels with tar around injectors; mis-matched tyres on full-time 4×4; heavy rust in rear chassis rails; hard-worked tow vehicles with no driveline fluid history.
Durability outlook
With routine fluids, timely belt service, and early attention to injector seals/EGR, the 120 often surpasses 200,000 miles (320,000 km) without opening the engine. Chassis bushings, shocks, and steering parts are consumables; treat them that way and the truck stays tight. The platform is friendly to preventive maintenance and rewards owners who keep ahead of age-related items.
Driving and performance
Ride, handling, NVH
The 120 rides with old-school SUV authority: a touch of head toss on broken city streets, but composed on B-roads and motorways. The double-wishbone front end resists dive better than the prior generation, while the live axle keeps traction in ruts. Steering is light-to-medium with reasonable self-centering. Cabin noise is subdued by period standards; at 70–75 mph (113–120 km/h), the diesel hums at relaxed rpm, with wind rustle around the mirrors rather than booming tyre noise (assuming OE-style all-terrains).
Powertrain character
The 1KD-FTV’s personality is defined by early torque: useful pull begins around 1,500 rpm and stays strong through 3,000 rpm. The manual’s gearing (4.313 first, 0.838 fifth) makes hill starts and towing straightforward, and the tall fifth settles the engine on the motorway. The 4-speed auto’s spread is narrower; it hunts a little on gentle hills but is smooth under steady throttle. Late 2005’s 5-AT adds a taller top gear and better spacing. Turbo lag is modest once the VNT is clean and the fuel system healthy; throttle response is best after an EGR and intake clean on higher-mileage examples.
Real-world economy
Expect 8.5–10.5 L/100 km (27.7–22.4 mpg US / 33.2–26.2 mpg UK) on steady highway runs at 60–75 mph (100–120 km/h), rising in winter or with a roof box. Mixed use often falls in the 9.5–11.5 L/100 km range (24.8–20.5 mpg US / 29.7–24.6 mpg UK). Short urban cycles with cold starts can push consumption higher; extended towing will add 2–4 L/100 km.
4×4 behaviour and tyres
Full-time 4×4 with a Torsen centre diff gives secure wet-road manners. A-TRC reacts quickly enough on gravel to keep momentum without harsh brake pulsing; it is less obtrusive than full locker engagement for light trails. Low-range (2.566) and the centre diff lock transform the truck for rock steps and steep descents; DAC is a useful safety net when tyres are wet. Tyre choice matters: OE-equivalent all-terrains preserve steering and braking feel; heavy mud-terrains can lengthen stopping distances and provoke more VSC activity on tarmac.
Load and towing
At the 2,800 kg braked limit with a braked trailer, the manual feels stoutest leaving junctions; both gearboxes benefit from a conservative approach (anticipatory braking, longer following gaps). Temperatures remain stable if cooling systems are healthy. Factor a 15–30% fuel-use penalty at motorway speeds when towing tall box trailers.
KDJ120 rivals and alternatives
Land Rover Discovery 3 (2004–2009)
- Why it tempts: refined air-spring ride, roomy cabin, strong V6 diesel.
- Why the 120 often wins: simpler mechanicals, fewer electronics, better reliability reputation as a long-term work truck.
- Trade-off: Discovery tows brilliantly and rides better on road when healthy.
Nissan Pathfinder R51 (2005–2012)
- Why it tempts: value and a strong 2.5 dCi; selectable 4×4.
- Why the 120 often wins: sturdier frame, better out-of-box articulation, stronger accessory ecosystem.
- Trade-off: Pathfinder prices are lower; check for timing-chain and injector issues.
Mitsubishi Pajero/Shogun (Mk3/Mk4)
- Why it tempts: proven 3.2 DI-D, Super-Select 4WD, good highway stability.
- Why the 120 often wins: interior robustness and parts availability; Toyota diesel longevity when maintained.
- Trade-off: Shogun can be better value; ride is firmer.
Jeep Grand Cherokee (WK)
- Why it tempts: torquey Mercedes-sourced diesel, comfortable seats.
- Why the 120 often wins: simpler transfer case, long-term parts supply, corrosion protection.
- Trade-off: WK rides and handles better on road when sorted.
References
- The All-New Toyota Land Cruiser 2002 (Press Release)
- Toyota Land Cruiser Powers Up for 2005 2004 (Press Release)
- Microsoft Word – Land Cruiser UK launch pack 2003 2003 (Technical Pack)
- Owner’s Manual | Customer Information 2024 (Owner’s Manuals)
- Recalls | Owners 2024 (Recall Checker)
Disclaimer
This guide is for informational purposes only and is not a substitute for professional diagnosis or repair. Specifications, torque values, service intervals, and procedures can vary by VIN, model year, market, and equipment level. Always confirm parts, fluids, capacities, and procedures against your official Toyota service documentation and follow safety instructions. If you found this helpful, please consider sharing it with fellow enthusiasts on Facebook or X/Twitter to support xcar’s work.