

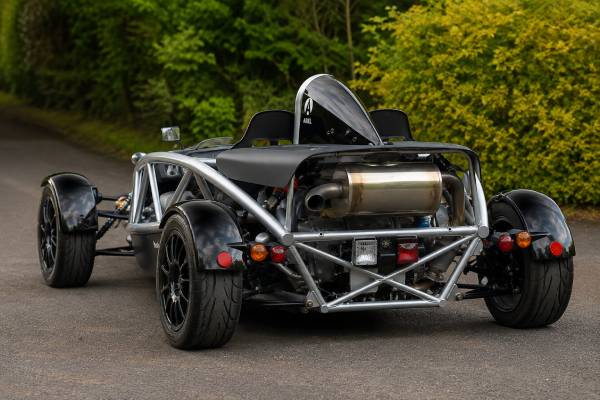
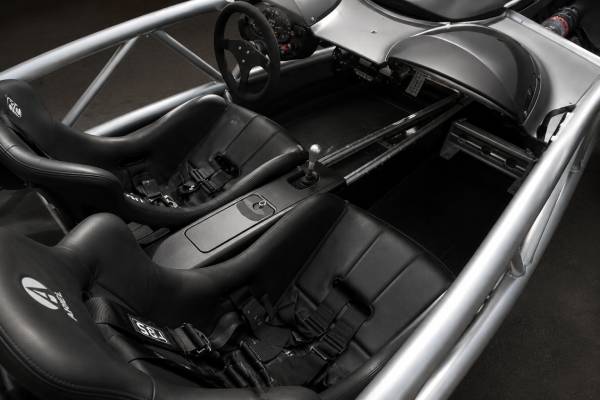
The Ariel Atom 2 LSJ Stage 1 is Brammo’s 230-hp step above the 205-hp Base car. It retains the supercharged 2.0-liter GM Ecotec LSJ, Eaton M62 compressor, air-to-liquid charge cooling, five-speed manual transaxle, and limited-slip rear drive, but raises output to 230 hp and 205 lb-ft. In the 1,350 lb U.S. chassis, the extra 25 hp is noticeable without creating the full thermal and traction burden of the later stages.
Stage 1 is also easy to misrepresent. The Base and Stage 1 share the same manual-listed belt class, and a calibration change can be invisible during a casual inspection. Some cars have moved through several stages, received aftermarket pulleys, or been returned to a lower tune. The only reliable description is the car’s current hardware and ECU calibration supported by records and load data. Buyers should focus on fuel delivery, aftercooler circulation, belt alignment, spark-plug condition, and repeatable intake temperature—not on a seller’s claim that Stage 1 is “just a chip.”
Table of Contents
- The Engineering Step From Base to Stage 1
- Stage 1 Technical Data
- How 230 hp Changes the Atom
- Calibration, Fuel, and Ignition Validation
- Belt Drive, Cooling, and Heat Soak
- Driveline, Brakes, and Tires
- The Stage 1 Documentation and Test Process
The Engineering Step From Base to Stage 1
Stage 1 raises the LSJ Atom from 205 to 230 hp while torque increases only slightly, from 200 to 205 lb-ft. That pattern suggests a specification aimed at carrying stronger power through the rev range rather than delivering a dramatic low-speed torque spike.
The car remains a Brammo-built U.S. Atom 2. Its published curb weight is 612 kg, and its five-speed limited-slip transaxle differs from the six-speed Honda arrangement used in many British cars. The engine sits transversely behind the seats inside an exposed steel frame, with the radiator and charge-cooling heat exchanger located in the airflow toward the front.
The Eaton M62 is a positive-displacement supercharger. It supplies air in direct relationship to engine operation, producing immediate response rather than waiting for exhaust energy. An electronic throttle and bypass system help control load. The air-to-liquid aftercooler removes some of the heat created by compression before the air enters the cylinders.
Stage 1’s modest torque increase can make it an appealing road-and-track compromise. Rear traction remains easier to manage than in a 300-hp car, yet the stronger upper range improves acceleration on longer straights. Engine, clutch, and gearbox loads rise, but the package does not require the more aggressive belt reference listed for Stage 2 and Stage 3.
That apparent simplicity is why poor documentation is dangerous. A tune may alter fuel, ignition, throttle, rev limit, cooling-fan behavior, and diagnostic thresholds. A pulley change may increase boost without an obvious external label. Injectors, pump, plugs, and exhaust can be changed independently. The name “Stage 1” is useful only when those systems match the intended package.
The original build should be established through the VIN and Brammo records. Then the current state should be established through part numbers, pulley measurement, belt routing, ECU information, and data logging. A car can be originally Stage 1 yet currently modified beyond it; another may have started as Base and received a correctly documented Stage 1 upgrade.
Stage 1 Technical Data
The Stage 1 is a supercharged gasoline ICE car with a 1,998 cc GM LSJ four-cylinder, five-speed synchronized manual gearbox, limited-slip differential, and rear-wheel drive. Brammo’s manual lists 230 hp and 205 lb-ft for this stage, along with U.S.-specific capacities and chassis data.
| Specification | Manual-listed value |
|---|---|
| Engine code | GM Ecotec LSJ Stage 1 |
| Layout | Transverse inline four-cylinder, mid-mounted |
| Displacement | 1,998 cc (2.0 L) |
| Bore × stroke | 86.0 × 86.0 mm |
| Compression ratio | 9.5:1 |
| Valvetrain | DOHC, 16 valves |
| Maximum power | 230 hp (172 kW) |
| Maximum torque | 278 Nm (205 lb-ft) |
| System | Specification |
|---|---|
| Compressor | Eaton M62 helical Roots-type supercharger |
| Charge cooling | Air-to-liquid system |
| Throttle | Electronic throttle control |
| Fuel system | Sequential electronic injection |
| Fuel requirement | Premium unleaded gasoline |
| Published LSJ boost context | Approximately 12–19 psi across the Base-to-Stage 3 family |
| Specification | Manual-listed value |
|---|---|
| Transmission | Five-speed synchronized manual transaxle |
| Differential | Limited-slip |
| Drive | Rear-wheel drive |
| Curb weight | 612 kg (1,350 lb) |
| Seating | Two |
| Panel material | Fiberglass or optional carbon fiber |
| Position or system | Manual-listed specification |
|---|---|
| Front wheel | 15 × 7 in, +35 mm offset |
| Rear wheel | 16 × 7 in, +38 mm offset |
| Recommended front pressure | 124 kPa (18 psi) cold |
| Recommended rear pressure | 138 kPa (20 psi) cold |
| Suspension | Independent pushrod-operated spring and damper units |
| Item | Manual-listed value |
|---|---|
| Fuel capacity | 36.7 L (9.7 US gal) |
| Engine oil | Six US quarts; synthetic 5W-30 specified |
| Manual-transaxle fluid | Approximately 1.99 L (2.1 US qt) |
| Cooling system | Approximately 10.4 L (2.75 US gal) |
| Base/Stage 1 belt | 20 × 1,315 mm class; NAPA/Gates 25-060512 listed |
| Brake fluid | DOT 4 |
The broad boost range is not a Stage 1 target. Determine actual manifold pressure from the installed pulley and calibration, with altitude and measurement method recorded.
How 230 hp Changes the Atom
Stage 1 feels stronger than the Base car mainly as speed rises. The additional horsepower shortens straights and reduces passing time, while the small torque increase keeps low-speed response comparatively progressive.
The M62 delivers pressure promptly, so there is no waiting for a turbocharger to spool. At partial throttle the bypass and electronic throttle soften compressor work. Under load, the car accelerates with a broad surge that continues through the upper range. A correct Stage 1 should feel smooth, not peaky or erratic.
Using the manual-listed 612 kg curb weight, 230 hp equals approximately 376 hp per metric tonne. That figure is already beyond many conventional sports cars, and the open cockpit makes the rate of acceleration feel even greater.
Rear grip remains the practical limit in lower gears. The limited-slip differential helps put power down, but full throttle while steering can still overload both rear tires. The Stage 1 car may be easier to modulate than Stage 2 or Stage 3, which makes it a sensible choice for a driver who values repeatable exits over wheelspin.
The stronger upper range also changes braking. The car arrives at the next corner faster even when the engine does not feel dramatically more forceful. Use fixed braking markers and build speed gradually. Braking too late, then turning abruptly, can unload the rear and create rapid rotation.
Tires define the margin. The manual’s low cold pressures suit the original lightweight application, but a modern tire package may need another baseline. Old, heat-cycled rubber can make a healthy Stage 1 feel dangerous. Match front and rear compounds and monitor hot pressure and wear.
High-speed wind load remains a limiting factor. Exposed suspension, wheels, helmet, and shoulders produce drag and turbulence. The car excels in short bursts and complex sections rather than sustained highway-speed travel. Hearing and eye protection reduce fatigue and distraction.
The Stage 1’s balanced performance can be its greatest strength. It gives enough power for serious circuit use without making every lap a thermal test. The owner should resist unnecessary escalation until the chassis setup and driving technique are fully developed.
A well-driven Stage 1 can also be easier on consumables than its speed suggests. Progressive throttle reduces rear-tire temperature, clean shifts protect synchronizers, and consistent braking preserves pads. These gains come from preparation rather than detuning: stable pressures, fresh rubber, a marked brake-bias baseline, and a driver who reviews data between sessions all extend useful running time.
Calibration, Fuel, and Ignition Validation
Stage 1 is defined as much by calibration as by hardware. Safe power requires the ECU, injectors, pump, fuel pressure, spark plugs, throttle, and exhaust to agree under sustained boost.
Identify the ECU and map source. Brammo or a recognized stage supplier may have provided a known calibration; later owners may have flashed or replaced it. Save the current file before making changes and record calibration identifiers. A sticker on the case is not proof of what is loaded.
Premium fuel is mandatory. Establish the octane standard used in the tune because U.S. Anti-Knock Index and Research Octane Number are different scales. A map intended for one fuel may not be safe on another. Avoid high-load testing with old or unknown gasoline.
Fuel pressure needs to be checked under load. A pump can maintain idle pressure while voltage drop, filter restriction, tank contamination, or heat reduces delivery at high flow. Inspect wiring, grounds, relay, connector, hoses, filter, and injectors. Data should show pressure relative to manifold demand where the system design requires it.
Mixture alone is not the entire safety picture. Log ignition advance, knock response, intake-air temperature, coolant temperature, throttle, manifold pressure, engine speed, and injector duty. A rich mixture can still coexist with excessive heat or timing. A single clean pull does not prove repeatability.
Spark plugs should match the stage. Verify part number, heat range, gap, torque, and condition. Compare all four. Speckling, damaged electrodes, glazed insulators, oil deposits, or one unusually clean cylinder can indicate problems. Replace only after documenting what the old plugs show.
Coils and electrical grounds operate in a vibrating exposed environment. A weak coil may misfire only at high cylinder pressure. Check connectors and harness strain relief. Do not mask a misfire by reducing plug gap without diagnosing the underlying cause.
Electronic throttle behavior should be smooth and predictable. A tune can make the first portion of the pedal excessively aggressive, which creates an impression of speed while reducing control. Verify that commanded and actual throttle agree and that failsafe functions remain intact.
Exhaust changes alter airflow, noise, and calibration needs. Inspect for cracks, failed hangers, leaks near sensors, and heat affecting wiring or body panels. Confirm emissions and noise legality in the owner’s jurisdiction. A track-only exhaust may make the car difficult to register or use.
Dyno validation should include multiple pulls after the system is warm. Record ambient conditions, fuel, correction method, boost, mixture, and intake temperature. The objective is stable safe delivery near the expected output, not the largest number displayed by one test.
Belt Drive, Cooling, and Heat Soak
The Stage 1’s belt and two cooling circuits should be inspected before every serious event. Belt slip reduces boost; pump or airflow problems raise temperature; both can produce inconsistent power before triggering an obvious failure.
The Base and Stage 1 manual listing uses a 20 × 1,315 mm-class serpentine belt. Confirm the installed part and routing. A different belt may be legitimate with changed pulleys or accessories, but the owner should know why. Keep a correctly sized spare and the tools required for replacement.
Inspect ribs, edges, tension, and dust. Edge wear points to alignment. Glazing suggests slip or contamination. Cracks and missing material require replacement. Check idlers and tensioner for smooth rotation and bracket integrity. A belt thrown at speed can damage nearby hoses and wiring.
Supercharger condition includes shaft play, noise, bypass operation, and oil history where serviceable. Do not assume loud whine is healthy or high boost. Compare sound over time and investigate sudden changes. A leak downstream can make the compressor work harder while producing less manifold pressure.
The engine-cooling circuit uses a front radiator and long plumbing. Verify the manual-specified coolant type, correct fill, fan operation, cap, expansion tank, hose support, and bleeding. Stone blockage or a weak fan can show up only in hot traffic after a track session.
The charge-cooling circuit requires pump flow, coolant level, a clean heat exchanger, and no trapped air. Feel or observe flow safely and check electrical supply. A failed pump may not create a warning light. Log intake temperature to confirm performance rather than relying on reservoir temperature by touch.
Heat soak appears when intake temperature climbs on repeated runs and power or ignition advance falls. Some reduction can be protective ECU behavior; a rapid uncontrolled rise suggests insufficient circulation, airflow, coolant volume, or excessive boost. Compare data at similar ambient conditions.
After shutdown, heat can continue moving into fuel, wiring, and intake components. Inspect the car hot for seepage, loose couplers, and reservoirs pushing fluid. Allow proper cool-down instead of immediately covering or loading the car.
Keep circuits separate and clearly labeled. Adding engine coolant to the aftercooler reservoir or using incompatible mixtures can create trouble. Record service dates and products. If a previous owner changed the system, document hose routing, pump, heat exchanger, and bleed procedure.
Driveline, Brakes, and Tires
The Stage 1 driveline must transmit slightly more power than Base, but condition and setup matter more than the 25-hp difference. A tired clutch, worn synchronizer, unequal rear tires, or loose mount can make the car feel rough and unreliable.
Use the manual-listed transmission fluid unless the installed gearbox or limited-slip unit has documented different requirements. Check level and leaks, then inspect drained fluid for metal. Gear selection should be tested cold and hot. Problems in one ratio often point to synchronization; difficulty across the gate may be linkage or clutch related.
The clutch should engage progressively and hold full load. A high pedal or abrupt take-up is not proof of a racing clutch. Verify the installed disc, pressure plate, flywheel, and hydraulic setup. Repeated launch tests are unnecessary and can overheat parts.
Mounts control movement. Inspect rubber or polyurethane elements, brackets, fasteners, and contact marks. Excessive movement can strain cables, exhaust, driveshafts, and hoses. Solid mounts can create vibration that loosens hardware and fatigues the frame.
The limited-slip differential needs matched rear tires. Confirm size, model, pressure, age, and circumference. Noise on tight turns should be compared with the unit’s design; clunks or metal in fluid require investigation. Driveshaft boots and joints should be clean and tight.
Brake condition includes master cylinders and balance hardware as well as pads and discs. Replace DOT 4 fluid on a time and track-use schedule. Inspect for pad taper, disc cracks, caliper leakage, hose abrasion, and loose mounting bolts. Mark the bias adjuster and teach every driver not to move it casually.
Wheel condition is safety-critical. Confirm 15 × 7 +35 front and 16 × 7 +38 rear or document the alternative. Check spacers, hub fit, fastener engagement, cracks, and bends. Larger wheels can add mass and alter geometry.
The manual’s 18 psi front and 20 psi rear are a starting point for the original setup. Modern tires may operate differently. Measure hot pressures and temperature distribution, then change gradually. Low pressure can overheat sidewalls; excessive pressure reduces the contact patch.
Rod ends, bearings, dampers, and alignment complete the grip system. A powerful car with loose rear toe is unsafe regardless of tire compound. Inspect before each track day and after curb or off-track contact.
The Stage 1 Documentation and Test Process
A valid Stage 1 purchase requires two proofs: the car’s original Brammo configuration and its present mechanical calibration. Either can differ from the other after years of upgrades.
Begin with VIN records, original invoice, owner manual, and stage documentation. Ask when Stage 1 was installed, by whom, and whether the car started as Base. Request ECU invoices, dyno reports, pulley and belt details, injector and pump information, spark-plug specification, and exhaust changes.
Inspect part numbers. Measure pulley diameter, verify belt class, identify injectors, and examine the aftercooler system. Look for Stage 2/3 belt hardware, extra wiring, abandoned sensors, or capped hoses. These may reveal a previous configuration that the seller has forgotten.
Review maintenance by event rather than only date. Engine oil, plugs, coolant, aftercooler fluid, transmission fluid, brake fluid, rod ends, tires, wheel bearings, and brake pads should show a pattern consistent with use. A 2,000-mile car can have dozens of track days.
Require a cold start. Watch oil pressure, listen for chain and supercharger noise, and check smoke. Warm fully while verifying radiator fan and charge-cooler pump. Scan for active, pending, and recently cleared faults.
A controlled road or dyno test should log boost, intake temperature, mixture, fuel pressure, ignition activity, coolant, throttle, and rpm. Compare repeat runs, not just the first. Stop if pressure, temperature, or mixture becomes unsafe.
Evaluate chassis behavior separately. Check the five-speed gearbox, clutch, differential, steering, dampers, brakes, wheel bearings, and alignment. A strong engine can distract from a damaged frame or old tires. Inspect again when hot.
Use a specialist familiar with Brammo rather than relying solely on a GM tuner. The LSJ knowledge is valuable, but the Atom’s cooling route, rod ends, frame, pedal box, and registration equipment are specialized. Confirm support for any custom part.
Budget for baseline work immediately after purchase. Establish known fluids, plugs, filters, belt, cooling performance, geometry, tires, and safety hardware. Save the ECU file and create a photographic parts record.
A correctly validated Stage 1 is a persuasive middle choice. It offers a real improvement over Base without the more aggressive belt arrangement and heat load of later stages. Its value lies in coherent calibration and repeatable performance, not in whether an undocumented car happens to feel fast during one drive.
References
- BRAMMO ARIEL ATOM 2 2006 OWNER’S MANUAL 2026
- Ariel Atom (US) Useful documents 2026
- Ariel Atom, Ariel Nomad, Ariel North America Atom 4 2026
- Ariel Atom 2 | Gear Patrol 2010
- Ariel Atom (2000-): PH Pocket Buying Guide 2016
- Palatov-Designed Ariel Atom Uprights – Lightweight Motorsports 2026
Disclaimer
This guide cannot certify that an individual car retains its original Stage 1 package or that a calibration is safe. Verify VIN history, current hardware, pulley, belt, ECU file, fuel, fluids, service intervals, safety systems, and road legality through the Brammo documentation and qualified testing. Share it when it helps another owner replace stage-name assumptions with evidence.