

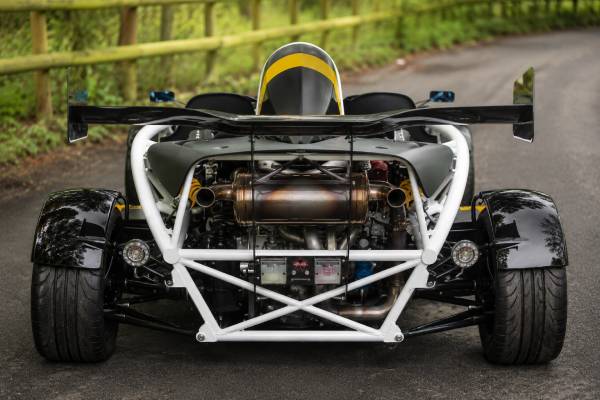
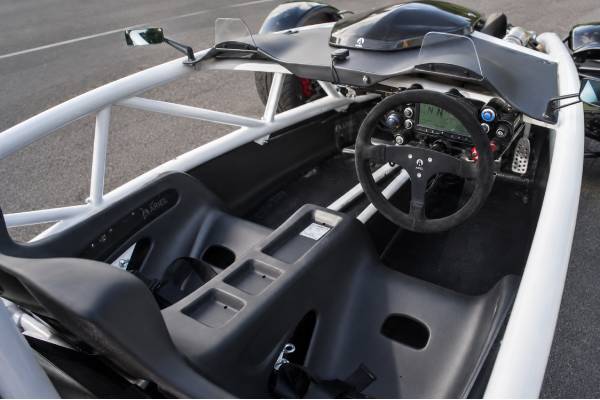
The Ariel Atom 3.5R is where the Honda-powered Atom became a miniature prototype-style machine. Ariel raised supercharger boost, added charge cooling and a separate oil-cooling circuit, installed a Sadev sequential transaxle with pneumatic paddle operation, and paired the package with Öhlins TTX dampers and large four-piston brakes. The result was 350 hp in a published 550 kg specification, a claimed 0–60 mph time of 2.6 seconds, and the ability to complete several downshifts in less than a second.
Those figures explain only part of the car. The 3.5R is demanding to operate correctly and highly sensitive to setup, temperature, and maintenance quality. Its specialized transmission and thermal systems create different priorities from a manual Atom 3.5 310. This guide identifies the factory configuration, explains how its subsystems work together, shows where misuse creates risk, and provides an inspection process for cars that may have spent much of their lives on circuits. The individual chassis record remains decisive because road packs, aero, wheels, and later updates can alter an example substantially.
Table of Contents
- What Makes the 3.5R Different
- Factory 3.5R Specification
- Boost, Charge Cooling, and Lubrication
- Sequential Transmission Operation
- TTX Suspension, Brakes, and Grip
- Ownership, Service, and Inspection
What Makes the 3.5R Different
The 3.5R is a coordinated factory package, not a 310 hp Atom with a smaller supercharger pulley. Its 350 hp engine, charge-cooling system, remote oil cooler, sequential pneumatic gearbox, uprated clutch, adjustable limited-slip differential, Öhlins TTX dampers, and 290 mm four-piston brakes were specified to work as one high-load system.
Ariel increased quoted boost from about 7.5 psi on the 310 to 11 psi for the R. Peak output became 350 bhp at 8,400 rpm, while torque rose to 330 Nm at 6,100 rpm. More boost produces more intake heat, cylinder pressure, and lubricant stress, so the side-mounted charge-cooling and oil-cooling hardware is fundamental rather than decorative. Removing, bypassing, or poorly repairing that equipment changes the safety margin of the entire engine package.
The transmission is an equally large distinction. A six-speed Sadev sequential unit replaces the conventional Honda-pattern H-gate arrangement. The driver selects the next or previous ratio with steering-wheel paddles, while the pneumatic system and engine controls coordinate clutchless shifts once the car is moving. Ariel stated that the system could execute five downshifts in under one second. That capability supports very late braking, but it also makes incorrect setup or careless operation potentially costly.
The 3.5R’s published weight of 550 kg is higher than some simpler Atom figures because it includes more substantial driveline, cooling, brake, and control equipment. Even so, its quoted power-to-weight ratio is roughly 636 bhp per metric tonne before accounting for occupants. The acceleration is therefore not a product of horsepower alone; low inertia, short shift interruption, strong brakes, and immediate supercharger response all contribute.
It is also a low-volume car with an option-rich build process. The factory specification reproduced in period literature describes an illustrated car with road equipment, but individual examples can differ in steering side, aero package, lighting, windscreen, wheel choice, silencing, restraint system, and later updates. Some cars may be road registered; others may have been configured predominantly for circuits. A badge, advert, or dyno sheet cannot establish the complete specification.
The 3.5R should consequently be judged as specialized machinery. A buyer who wants a straightforward open road car may prefer a manual Atom. A driver who understands sequential gearboxes, logs temperatures, maintains safety equipment, and values repeatable circuit performance can find the R uniquely rewarding. The car’s desirability depends less on whether it has been tracked than on whether that track use was disciplined and documented.
Factory 3.5R Specification
The Atom 3.5R is an internal-combustion, mid-engine, rear-wheel-drive two-seater with a supercharged and charge-cooled 1,998 cc Honda K20Z-family engine. Its factory technical sheet is unusually detailed, allowing the engine, sequential driveline, cooling, chassis, brakes, dimensions, and published performance to be separated cleanly.
| Item | Factory specification |
|---|---|
| Engine | Honda K20Z 2.0-liter inline-four, transversely mounted |
| Displacement | 1,998 cc |
| Bore × stroke | 86 × 86 mm |
| Valvetrain | Chain-driven DOHC, four valves per cylinder, i-VTEC |
| Induction | Eaton-type supercharger with charge cooler |
| Maximum power | 350 bhp at 8,400 rpm |
| Maximum torque | 330 Nm at 6,100 rpm |
| Fuel injection | Indirect multi-point grouped injection |
| Fuel tank | 40-liter aluminum tank in the factory specification |
| Item | Factory specification |
|---|---|
| Gearbox | Six-speed plus reverse Sadev sequential transaxle |
| Shift actuation | Pneumatic paddle shift with clutchless upshifts and downshifts |
| Gear sets | Interchangeable ratios and final drive |
| Differential | Adjustable limited-slip differential |
| Bellhousing | Billet aluminum |
| Clutch | Stage 4 uprated friction and pressure plates |
| Drive | Rear-wheel drive |
| System | Factory specification |
|---|---|
| Engine cooling | Electric coolant pump and front-mounted fabricated radiator |
| Charge cooling | Liquid charge-cooler circuit packaged with side-pod hardware |
| Oil cooling | Remote oil cooler |
| Intake | Ram-air box with ITG foam filter |
| Exhaust manifold | Fabricated stainless-steel 4-2-1 layout |
| Silencer | Stainless unit with twin outlets |
| Engine management | Hondata system |
| Item | Factory specification |
|---|---|
| Frame | Bronze-welded ERW/CDS steel tube with aluminum bulkheads |
| Suspension | Double unequal-length wishbones, adjustable pushrods, and aluminum bell cranks |
| Dampers | Öhlins TTX adjustable units with inline reservoirs |
| Steering | Unassisted rack and pinion, 1.7 turns lock to lock |
| Front brakes | 290 mm ventilated discs, four-piston calipers |
| Rear brakes | 290 mm ventilated discs, four-piston calipers |
| Pedal box | Tilton aluminum racing unit with twin master cylinders and adjustable bias |
| Item | Factory or published figure |
|---|---|
| Length / width / height | 3,410 / 1,890 / 1,195 mm |
| Wheelbase | 2,345 mm |
| Front / rear track | 1,600 / 1,600 mm |
| Published weight | 550 kg |
| Front wheels and tires | 7J × 15; 195/50 R15 |
| Rear wheels and tires | 8J × 16; 245/45 R16 |
| 0–60 mph | 2.6 seconds claimed |
| 0–100 mph | 6.0 seconds claimed |
| Maximum speed | 155 mph claimed |
The 40-liter tank in Ariel’s reproduced factory specification differs from the 42-liter figure seen in some broader Atom 3.5 data. That is why an owner should use the build documentation for fuel-system service and range planning. The same principle applies to overall width: wheel, tire, and body equipment can change the number measured at the car’s widest point.
Boost, Charge Cooling, and Lubrication
The 3.5R’s engine survives repeated high output only when airflow, charge temperature, coolant circulation, oil temperature, fueling, and ignition control remain inside the intended envelope. Its extra 40 hp over the 310 comes with a smaller thermal margin, so every cooling circuit deserves equal attention.
Compressing intake air raises its temperature. Hotter air is less dense and more prone to knock, which can force the ECU to reduce ignition advance or, in a poorly controlled system, expose pistons and ring lands to destructive pressure. The liquid charge cooler removes heat between the supercharger and engine. Its pump, core, reservoir, hoses, side-mounted heat exchanger, wiring, and bleed state must all function; a circulating pump that can be heard is not proof that the circuit is free of air or transferring heat effectively.
A buyer should ask for logged intake-air temperature rather than accepting a brief road pull as evidence. The meaningful test repeats full-load acceleration after the car is heat soaked and records ambient temperature, intake temperature, coolant temperature, boost, throttle position, fuel mixture, and ignition correction. A healthy system should recover between runs. A temperature that climbs without stabilizing points toward restricted airflow, weak circulation, air pockets, a contaminated core, or an undersized replacement component.
The remote oil cooler serves another critical role. Supercharger load and sustained high rpm add heat to the lubricant, while the K20’s bearings, cam system, chain drive, and piston cooling rely on stable oil pressure and viscosity. Inspect every hose, fitting, support, and cooler face for abrasion, weeping, impact damage, and nonstandard routing. An externally dry fitting can still be suspect if its hose has twisted, hardened, or rubbed against the frame.
Oil level should be checked by the procedure appropriate to the baffled sump and installation. Too little oil risks pressure loss under braking or cornering; too much can increase aeration and crankcase problems. Track owners should record consumption by engine hours or fuel used, not only by odometer distance. A sudden change in consumption, metallic debris in the filter, falling hot pressure, or oil pushed into the intake requires investigation before further high-load running.
The supercharger belt and pulleys reveal much about condition. Rubber dust, frayed edges, polished ribs, heat discoloration, eccentric tracking, or chirping can indicate alignment or bearing trouble. Because 11 psi is part of the calibrated package, pulley dimensions matter. An unknown pulley combined with an undocumented map is a warning even when the car feels fast.
Fuel delivery must also be verified under sustained load. The factory sheet identifies a 3.5-bar electric pump and twin filters, but age, contamination, wiring resistance, and replacement parts can reduce flow. A lean mixture at 8,000 rpm can damage the engine before a driver has time to react. Pressure testing, injector verification, and a logged air-fuel trace are more valuable than replacing the pump on an arbitrary schedule.
The K20Z remains mechanically familiar, yet the R installation is not equivalent to a stock road Honda. Spark-plug heat range and gap, valve clearances, filter restriction, crankcase ventilation, ECU calibration, exhaust back pressure, and fuel octane all interact with boost. Any modification should be treated as a new engineering combination and validated accordingly.
Sequential Transmission Operation
The Sadev pneumatic transmission is the defining operational feature of the 3.5R, and it should be used according to its control logic rather than like an automatic road gearbox. Correct air pressure, sensor calibration, ignition cut, throttle blip, linkage adjustment, oil condition, and driver technique determine whether shifts are fast and clean or destructive.
A sequential gearbox selects ratios in order through a rotating barrel. The paddles request an upshift or downshift; the pneumatic actuator moves the mechanism while the engine-management system briefly unloads the dogs. Once moving, the system can change gear without conventional clutch use when correctly calibrated. The clutch remains necessary for starting, stopping, selecting from rest, and managing low-speed situations.
Dog engagement permits rapid shifts because the transmission does not wait for synchromesh cones to equalize speed. The trade-off is that dogs and selector components dislike partial engagement. A weak air supply, slow actuator, incorrect cut duration, worn linkage, or hesitant command can round engagement faces. Symptoms include missed shifts, unexpected neutral, refusal under load, or a gear that disengages after selection.
The celebrated multi-downshift ability depends on coordinated rev matching. The system can request several lower ratios rapidly while braking, but engine speed must remain within a safe window. A driver should not use repeated paddle pulls to demand a mechanically impossible gear. Confirm how the fitted control software rejects over-revs and whether any ECU, gear-ratio, final-drive, tire-size, or sensor change has affected that protection.
Pneumatic health is easy to overlook. Inspect the compressor, reservoir, pressure sensor, regulator, valves, lines, fittings, actuator, wiring, and mounting. Listen for excessive compressor cycling, which may indicate a leak. Verify that pressure builds from cold, remains stable, and recovers consistently during repeated shifts. Oil, water, or debris in the air system can create intermittent faults that disappear during a static inspection.
Gearbox oil should match Sadev and Ariel guidance for the exact unit and use. Drain-plug debris offers useful evidence, but a clean magnet does not prove the dogs and forks are unworn. Ask for hours, event dates, rebuild invoices, ratio changes, and inspection reports. A transmission used for racing may have excellent records and scheduled rebuilds; a low-mileage road car may have years of neglected fluid and poorly adjusted low-speed operation.
The interchangeable ratio and final-drive feature is valuable but complicates identification. Compare the installed ratios with invoices and ECU configuration. A car geared for a short circuit may reach the limiter earlier than published road specifications suggest. Incorrect gear-position calibration can disrupt shift timing, dashboard indication, and downshift protection.
During a professional test, evaluate neutral selection, first-gear engagement, launch behavior, upshifts at light and high load, single and multiple downshifts, hot operation, and pressure recovery. A harsh sensation alone is not a diagnosis—dog boxes are mechanical—but inconsistency is significant. The same command at the same load should produce the same result.
Low-speed maneuvering deserves patience. Use the clutch deliberately and avoid prolonged slip, repeated rocking between ratios, or trying to make the car creep like a torque-converter automatic. The uprated clutch is built for load, not comfort. Trailer loading should use suitable ramps, a spotter, and ideally a winch rather than sacrificing clutch material on a steep approach.
TTX Suspension, Brakes, and Grip
The 3.5R’s chassis hardware provides enormous control authority, but adjustment without measurement can make it unpredictable. Öhlins TTX dampers, pushrod geometry, adjustable rod ends, brake bias, differential settings, tire pressures, and aero balance should be treated as one setup rather than isolated knobs.
TTX dampers use a twin-tube architecture designed to control pressure and separate damping functions effectively. Their adjusters offer meaningful range, so a few clicks can alter platform movement, curb compliance, traction, and steering response. Start from a documented baseline. Record every change, alter one variable at a time, and evaluate several laps rather than reacting to a single corner.
Damper condition matters more than the name on the reservoir. Check for shaft damage, leaks, loose spherical bearings, contaminated adjusters, and unequal response. Ask when the units were last serviced and by whom. Nitrogen pressure, seals, oil condition, piston wear, and shim integrity cannot be confirmed by wiping the bodies clean.
Ride height and pushrod adjustment affect corner weights and suspension travel. Set the car with its normal driver mass, fuel quantity, and tire package. Confirm that left-to-right values make sense and that no spring perch or pushrod has been used to disguise a bent component. After ride-height changes, recheck toe, camber, steering rack position, bump steer, and aero clearance.
The 290 mm four-piston brakes are powerful enough to make tire grip the limiting factor. Inspect disc thickness, heat checking, runout, pad taper, fluid age, piston condition, line security, and pedal-box operation. Adjustable bias is useful for matching tires and conditions, but it can also create rear lock. Mark a safe baseline and restrict casual adjustment.
Tire selection determines how accessible the chassis is. The specified staggered 15-inch front and 16-inch rear arrangement gives the car a substantial rear contact patch, but compound, age, heat cycles, and pressure matter more than nominal width. A competition tire that has hardened through heat cycling may retain tread while losing predictable grip. Replace based on condition and history, not appearance alone.
The limited-slip differential changes entry, mid-corner, and exit behavior. Excessive locking can promote understeer on power or instability during deceleration; too little can waste drive through the unloaded rear tire. Adjustment should follow the gearbox supplier’s procedure and be documented with the ratio set, tire, alignment, and driver feedback.
Aero-equipped cars require mount inspection and balance. Wings can add useful load at speed, but cracked brackets, loose fasteners, damaged endplates, or an unsupported aftermarket angle can create risk. Verify that front and rear devices belong together and that ride height keeps them working in the intended range. More wing is not automatically more grip if it overwhelms one axle or increases drag beyond the circuit’s needs.
The driver remains part of the setup. The car has no conventional body movement or insulated control response to hide errors. Smooth brake release, measured steering rate, and progressive throttle let the hardware work. Abrupt inputs can produce a fast transient that looks like a setup problem but begins with technique.
Ownership, Service, and Inspection
Buying and owning a 3.5R successfully requires a written baseline for every major subsystem. The essential evidence is not low mileage; it is a traceable build, verified control calibration, scheduled driveline service, logged thermal behavior, and a structure that has not been concealed beneath cosmetic refurbishment.
Start with Ariel identity records. Match chassis and engine numbers to registration documents, factory invoices, and option sheets. Confirm that the car was built or officially upgraded as a 3.5R, then identify steering side, road pack, aero, brakes, dampers, gearbox serial number, ratio set, differential setup, ECU, paddle-control hardware, wheels, and restraints. Photograph labels and part numbers for the maintenance file.
Inspect the frame bare and clean. Look along tubes for distortion, local flattening, fresh powder coating, heat marks, drilled holes, non-factory welds, and corrosion beneath chips. Concentrate on suspension pickups, engine and gearbox mounts, seat and harness structures, lower rails, jack or tie-down contact points, and areas near coolers. A professional dimensional check is justified when history or symmetry raises doubt.
Review cooling circuits separately. Pressure-test the engine-coolant and charge-cooler systems, confirm pump flow, inspect front and side heat exchangers, and verify fan operation. Check that hoses are supported without kinks or chafing. Then inspect the oil cooler and lines, looking for contact with sharp edges or hot exhaust components. Replacement hose specifications and fitting types should be documented.
Require a cold start and a controlled hot test. Watch oil-pressure and temperature behavior, listen for chain, bearing, belt, and supercharger noises, and verify stable idle. Once fluids are fully warm, log boost, fueling, ignition correction, coolant temperature, intake temperature, and voltage under progressive load. Stop immediately for detonation, pressure loss, misfire, overheating, or an unexplained warning.
Assess the sequential system with a technician familiar with Sadev and the fitted pneumatic controller. Check air leaks and compressor duty, sensor readings, cut and blip settings, gear-position calibration, clutch release, shift consistency, oil condition, and fault history. Obtain a rebuild estimate before purchase when records are incomplete; the possibility of gearbox work should be reflected in the price rather than ignored.
Safety equipment has a service life. Inspect harness labels and webbing, seat shell and mounts, steering-wheel release, extinguisher if fitted, battery restraint, pedal box, brake lines, wheel integrity, and tire dates. Track-day organizers and road authorities may apply different requirements, so road registration does not guarantee that every safety item is current for competition use.
Maintenance planning should use engine hours and event load alongside mileage. A sensible file records oil and filter changes, gearbox oil, brake fluid, coolant, charge-cooler service, belts, plugs, valve clearances, air-filter cleaning, damper rebuilds, brake measurements, alignment, corner weights, tire heat cycles, clutch work, pneumatic faults, and ECU revisions. Add post-event inspections after curb strikes, spins, gravel excursions, over-revs, or temperature alarms.
Consumables and specialist parts should be sourced before they are urgently needed. Keep correct filters, plugs, belts, fluids, brake pads, gearbox oil, pneumatic fittings, and wheel fasteners, plus supplier contact details and current part numbers. An obsolete control component or unidentified custom hose can turn a minor fault into a long interruption.
Road use requires a different discipline from circuit use. Check current lighting, mirrors, mudguards, parking brake, emissions equipment, silencing, number-plate placement, tires, and registration conditions in the applicable jurisdiction. Weather and visibility are genuine hazards in an open car. Eye and hearing protection, secure clothing, and a realistic plan for rain are not optional comforts at sustained speed.
A strong 3.5R may show hard use without showing neglect. Stone damage, carefully logged track hours, frequent fluid changes, and documented rebuilds can be more reassuring than a polished car with no records. Conversely, a fresh respray, vague “fully serviced” claim, and unexplained ECU or pneumatic changes should trigger deeper investigation.
The final purchase decision should include a reserve for specialist work. Even a healthy example can require damper service, tires, belts, safety equipment, gearbox inspection, or cooler hoses simply because of age. Budgeting for those items preserves the car’s performance and prevents an owner from postponing the exact maintenance that makes a 350 hp, 550 kg sequential Atom safe to exploit.
References
- Ariel Atom 3.5R spec
- Ariel Atom 3.5R
- Ariel Atom 3.5R pictures, specs and video review
- 2014 Ariel Atom 3.5R Specifications
- Ariel Atom 3 | PH Used Buying Guide
- Our History
Disclaimer
Specifications, option packages, shift-control settings, service intervals, road-legality requirements, and performance claims can differ by build date, market, competition use, later updates, and test method. Verify the chassis number, Ariel records, Sadev documentation, installed cooling and control hardware, current regulations, and specialist workshop information for the exact car before purchase, service, modification, or high-speed use. Share this guide with another Atom owner or prospective buyer who needs a careful 3.5R inspection framework.